

Separate a tool that cannot build tension from a package that loses tension after sealing before you change any setting. By following the strap path, checking the battery and drive components, and measuring the finished package, you can identify the fault and select a safe working tension for the load.
Key takeaways
- Separate tension-building faults from tension-loss faults before changing settings.
- Match strap width, thickness and material to the tool and package.
- Set working tension for the load, not the machine’s maximum.
- Test the battery, weld and drive components under load before replacement.
Start by separating build-tension faults from tension-loss faults
Do not raise the tension setting after the first loose bundle. In battery strapping troubleshooting, first decide whether the tool cannot build tension or builds it and then loses it. Compare one failed cycle with a known-good package and record:
- Strap material, width and thickness; battery identification and charge state.
- Selected tension, package dimensions and weight, fault code and cycle time.
- Break location and weld appearance.
- If the tool never reaches tension, inspect battery voltage sag, drive-wheel slip, an obstructed strap path, incorrect strap dimensions and mechanical faults.
- If the tool reaches tension but the finished package loosens, investigate strap relaxation, corner damage, poor weld quality and package settling.
The display setting is not the tension retained by the load. Strap-to-product friction, corner resistance, elongation and feed-wheel slip reduce package tension after the tool stops. Check the finished strap with a calibrated tension gauge; do not treat the dial or display as proof.
Clean the specified feed-wheel and tension-wheel contact surfaces before changing settings. Dust, coating, adhesive residue or strap fragments reduce traction, while glazed wheels alter effective diameter; adding lubricant can increase slip and contaminate the weld.
A battery-powered tool does not make local mains power the first suspect. Check the battery and tool mechanics first, then examine the charger, charging temperature and battery maintenance if the charge state is abnormal. This branch prevents strap tension problems from becoming a cycle of increasingly unsafe settings.
Check the strap specification, routing and mechanical contact points
An incorrect strap width or thickness can imitate a weak tension drive: a narrow strap slips in the wheel, while an oversized strap binds in the guide or fails to seat in the tension channel. Match the material, width and thickness to the machine specification before changing the tension setting.
- Record the strap material, width and thickness, then compare them with the tool’s permitted range.
- Confirm that the strap leaves the coil in the correct direction and enters the guide centred, flat and without a twist.
- Trace the full path around the package; a strap trapped against a guide, conveyor rail or corner protector will not pull evenly.
- Clean resin dust from feed wheels and tension rollers. Smooth, glazed or worn wheels lose grip and imitate low tension.
- Check the tension roller for grooves, flat spots and free movement; damage creates pulsing or inconsistent pull.
- Inspect the brake and dispenser for drag. Excess brake force looks like a drive fault, while insufficient braking leaves slack before tensioning.
- Look for sharp guide edges, crushed strap and abrasion marks that identify the contact point.
For battery strapping troubleshooting, run the same tool and strap on a controlled test bundle away from the conveyor. Stable tension off-line directs attention to stopping accuracy, transfer gaps, guides and conveyor alignment; failure in both locations points back to the strap path or worn contact parts.
Do not call these strap tension problems until those checks are complete.
Set working tension for the load, not the machine maximum
Set working tension from the package’s strap type, size, weight and handling risk, not from the machine’s 2,500 N maximum. Excessive force can crush cartons, cut into corners or break PP before the weld; insufficient force lets a load shift during conveying.
| Strap and package | Starting decision | Verification |
|---|---|---|
| PP on light cartons or printed cases | Use the lower part of the approved PP range; allow for PP elongation and relaxation | Measure the finished package after the strap has settled |
| PP on irregular or compressible loads | Increase only until the load is restrained without corner damage | Check compression, strap marks and retained tension after handling |
| PET on dense, heavy or rigid loads | Use the approved PET range; PET normally retains tension better than PP | Confirm the strap is tight without product deformation or edge cutting |
Use a calibrated tension gauge on the finished package, not the tool display alone. Record the selected setting and compare it with the gauge reading on a known-good package; the difference reflects friction, corner resistance, elongation, wheel slip and relaxation.
For repeatable results, verify each trial with these checks:
- Keep the strap perpendicular to the package and use corner protectors where edges are sharp or small-radius.
- Confirm the strap width and thickness match the tool setting and manufacturer’s approved range.
- Test three packages of the same type after the strap has settled, then adjust in small increments.
- Stop increasing tension when strap tension problems appear at corners, the carton deforms, or the weld remains sound but the load is already secure.
Test the battery, charger, motor and tension-drive components under load
Test the tool on a strapped package, not in free air. Connect a voltmeter at the battery terminals and watch the reading during acceleration and peak tension; a sharp drop followed by slow tensioning or motor cut-off indicates voltage sag. Check the battery charge level, seating, contacts and temperature before blaming the charger.
A battery strapping machine tension fault in Pune is not automatically a mains-power fault: verify charger input, output, charge completion and charging temperature.
| Fault or test | What you observe | Likely cause |
|---|---|---|
| Voltage under peak load | Voltage collapses while current demand rises | Weak, cold, aged or partly charged battery |
| Charge test | Battery never reaches full charge, or charger shows an error | Charger fault, poor input, dirty contacts or battery failure |
| Temperature test | Motor housing becomes too hot after repeated cycles and tension falls | Overload, excessive duty cycle or motor deterioration |
| Wheel traction test | Feed wheel spins, polishes the strap or leaves dust; tension rises in pulses | Wheel slip from contamination, wear or wrong strap |
| Roller inspection | Grooves, flat spots or sharp edges mark or obstruct the strap | Damaged tension roller |
| Brake release test | Strap creeps backward when the trigger is released | Brake not holding, misadjusted or contaminated |
Record battery voltage, tension-gauge force and motor temperature at each failed cycle. For battery strapping troubleshooting, clean dust from the wheel and weld area, but do not treat cleaning as proof of repair. Confirm final package tension with a calibrated gauge; the machine display records a setting, not retained tension.
Inspect the weld and conveyor sequence before specifying a replacement
If the tool reaches its tension setting and the strap loosens afterward, inspect the weld before increasing force. A weak seal can mimic tension loss.
1. Run the same tool, battery and strap on a fixed test bundle away from the conveyor. Stable tension off-line shifts attention to package movement, guides and controls; a fault in both tests points to the tool, battery, strap path or specification.
2. Examine the weld face, seal width, peel behaviour and strap fracture pattern. Insufficient heat, contaminated strap, incorrect heating time or incompatible strap leaves a seal that opens after release; excessive tension can crush or cut the strap at the weld.
3. Confirm that the conveyor holds the package completely still before tensioning. Check photoeye bounce, stop-cylinder timing, dwell time, vibration, transfer gaps, package alignment and strap guides. The controller must confirm package presence and the correct stopped position before enabling tension, then release the package only after sealing and cutting finish.
4. Require documented proof from a conveyor manufacturer battery strapping for tension problems in Pune: permitted strap material and dimensions, working tension range, package-size limits, battery and charger requirements, conveyor speed, stopping accuracy and every interface signal exchanged with the strapping cycle. “Compatible” proves nothing.
Ask ASN Packaging PVT LTD to demonstrate repeat cycles on your smallest and heaviest packages, with recorded tension, weld inspection and stop-position results. A battery strapping machine tension fault in Pune is not automatically a mains-power fault; inspect the charger, charging temperature and battery maintenance before blaming the supply.
Related product
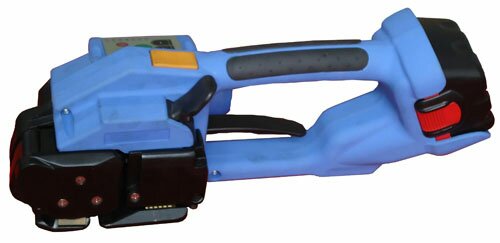 | BATTERY OPERATED STRAPPING MACHINE ₹122000 1) Model No: ZP 22 6 B. for PP & PET Strap: With Brushless motor technology. for *Size: 12 mm & 16 mm. Thickness: up to 1 mm. Max Tension : 2500N. View product → |
Frequently asked questions
How do you distinguish a build-tension fault from a tension-loss fault?
Compare a failed cycle with a known-good package. A build-tension fault occurs when the tool cannot tighten the strap; a tension-loss fault occurs when it tightens the strap and loses force before sealing or after release.
What should you check before adjusting battery strapping tension?
Confirm the strap specification, then inspect routing, guides, rollers, grippers and other mechanical contact points for mismatch, contamination, wear or excessive drag.
How should you set working tension on a battery strapping machine?
Set tension for the load and strap specification. Do not use the machine maximum unless the package, strap and joint are rated for that force.
What components should you test under load for a tension fault?
Test the battery and charger, then inspect motor output, tension-drive components, weld quality and conveyor sequencing during a complete loaded cycle.